
 Posted on
by
Posted on
by  10 Comments
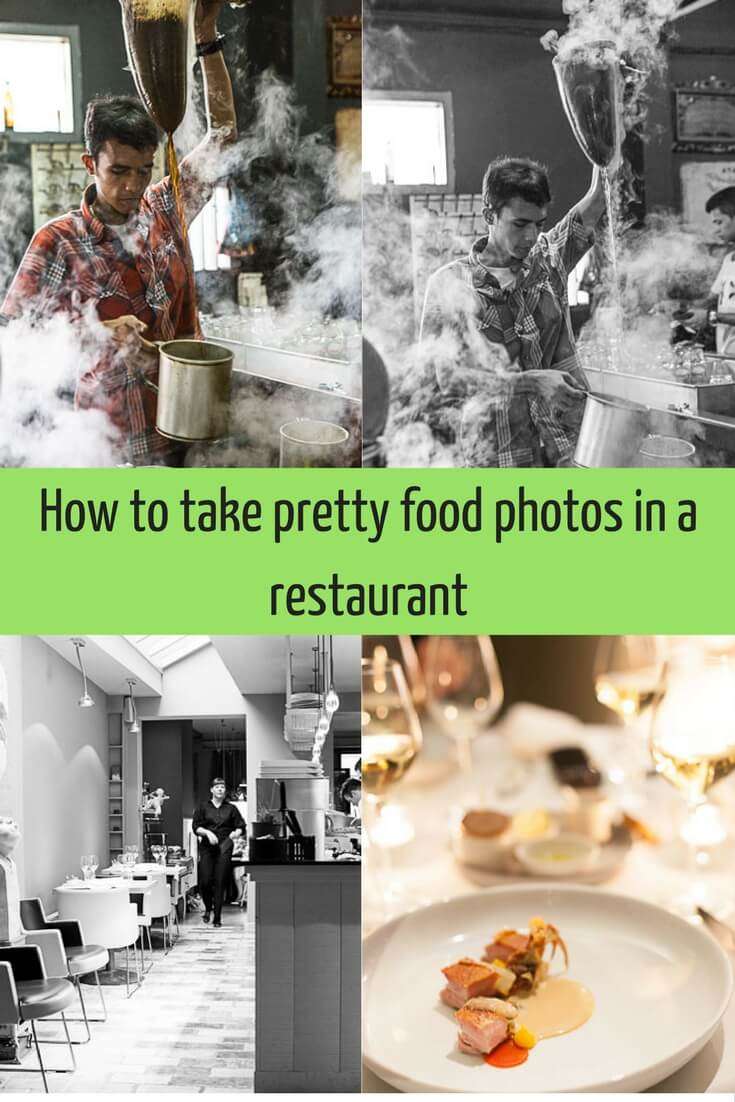
 Do you like to take food photos in a restaurant while dining out but you’re struggling to get it right? With these simple tips it will become a bit easier!

What can you find in this post:
Shooting in difficult conditions
Taking pictures of your food in a restaurant is a big thing these days. We all have our phones at the ready and as soon as the food comes out we start snapping away. Sounds familiar? However… not all those photos come out the way you intended and especially shooting in a restaurant can be a nightmare waiting to happen.
I’m not gonna lie about it; shooting photos in a restaurant can be very tough. Bad lighting, multiple light sources, bright spotlights.. you can encounter all. But as a foodie and a photography nerd those are the moments I wánt to take photos. But in all honesty; sometimes the conditions are so difficult and unappealing that the best thing to do is to put your camera away and just enjoy the food.
Not every situation can be solved on the spot. But how do you make the most of a difficult situation? I will walk you through a couple of situations and also show how to use your software to correct colorcast.

Raw versus jpg
To start with the hard part: do you take your photos in raw or in jpg? What is raw? I always compare it to the old fashioned film roll and that final print your got back from the printer. You can compare your raw file with that old filmroll and the finished photo with your printed one.
A raw file is in essence a digital negative and contains all information of your image still in it. A jpg is a compressed image (and so much smaller) where your camera’s software has done all sorts of enhancements already; the image is sharpened, the colors are more vibrant and – as mentioned – the image is compressed. And voila, you have a jpg image. A jpg straight out of the camera will always look better than a raw image straight out of the camera. And that brings me to the greatest disadvantage of shooting in raw; you have to edit each and every single image as you won’t be able to use it right away. That plus the giant size. To compare: a raw from my camera is 25MB, that same picture in JPG is 4-5 MB. Huge difference!
So why raw?
When you work in a restaurant at night you have to deal with the color of the lights they are using. Those colors need to be corrected and that is where RAW gets the upper hand easily. Because all the information is still contained in the image you can still correct the colortemperature in RAW. JPG lets you do it too but only very limited and colors start to look strange and unnatural really quick. So always shoot in RAW when you’re shooting at night is the main recommendation.

So what do you need to take an acceptable photo in a restaurant?
- Preferably an SLR. While I love my Iphone and will use it whenever I can, an SLR is simply better for these kind of photos.
- A lens that is light and has a big max aperture. I like to use my 50mm f1.4 lens. Your standard kit lens (usually a 18-55mm) is less suited for photos in low light.
- A white napkin or white plate can come in handy
- A patient table partner
- Probably a high iso
- Camera on the manual setting tends to be easiest!

Those shitty lights
To start with the available light. If you can choose try and find a spot with a somewhat even lighting. Bright spotlights above the table are notoriously difficult to handle and preventing is easier in this case.
Check the light by taking a test photo of something on the table. If you have spotlights, check what happens if you ask your table partner to hold a white napkin above your plate. You do need assistance here as you won’t be able to do it alone. The picture below was taken in a restaurant in Norway and the person sitting next to me hold a white napkin above the plate, so I could take a decent picture. Of course in this particular case it helped that we had a table full of food bloggers.. 🙂 They don’t mind people doing weird things. It’s not a perfect picture by any means but it is reasonable.

Go into the kitchen!
Another good tip is to go into the kitchen. Depending on the country where you are the light tends to be much better there as people are working and you will be able to take a good photo without too much trouble. Many chefs like it when you take an interest in their work as long as you make sure not to get in the way. The light in the kitchen tends to be better in the US and Europe versus Asia by the way. Concentrate there on shooting action shots like the one below. Steam and action is always a good choice!


Change to black & white
Maybe not the best of tips, but sometimes changing a photo from color to black & white is the only option. I love B&W and prefer them in a lot of cases over color, especially when it involves people. Food I do tend to put in color but if the situation is impossible it’s not so bad to change to b&w. If your photos came out with all the colors of the rainbow except the right one, changing to black and white might still give you a good result.

Try and avoid multiple light sources
It’s hard to avoid sometimes, but try and avoid to have more than one lightsources in your frame. In the below two photos you can see what happens if you do have more than one. Especially the photo on the left. You see that a light is aimed at the wall and one at the table. Both lights have a different color temperature. You can only correct for one color, not for two or at least it will never be ideal. If you zoom in further as with the photo on the right you don’t have the actual light sources in view but you still see that weird blue glow on the table from the other light.

- If you have any choice pay extra attention to where your light is coming from in relation to your plate of food. Food is always best shot with light from the side or from behind. Try and see if you can make that happen somehow. I sometimes shoot someone elses plate if that works out better.
- If you have a lot of heavy shadows from the side have someone else use a white napkin (outside of the frame) to fill in the shadows where possible.
- If you find that the light is better in a different place in the restaurant, try and take pictures when the plates are being brought out. That also gives you a human element which makes the focus shift from horrible light to something else.

- I know it is annoying but try and pay attention to your shutter speed. I have a good ear for the sound of the shutter and can hear it when someone else makes a picture with a shutter speed that is way too slow. And that happens a lot! Try and get used to checking in your viewfinder at the little numbers at the bottom of your frame. Anything below 1/60s or if you know you have a steady hand 1/30s has a big chance of being blurry. The closer you are to your subject the more likely a blurry image becomes as it is more apparent up close. If your shutterspeed drops too low increase your iso.
Editing
And than last but certainly not least, something about editing. Especially with low light photography you can’t really do without as the next examples show you.

Above you see a screenshot of the before and after of a photo taken in a restaurant in France On the left you can clearly see that the white plate appears yellow. That is easily corrected in software such as Lightroom, Photoshop, Photoshop Elements or whatever other program you prefer. When shooting in Raw you need a raw converter. Such a program lets you edit your photos and convert them from raw into jpg. In the software editing tools you see a little eyedropper. Pick that up and click on an area of the image that should be white.. In this case I used the plate itself and with one click the colors is corrected.
In this case I corrected the white balance, adjusted the lighting with an increase of 0,25 and increased contrast with +28.

In the second example (in the same restaurant) you also clearly see the difference between before and after. Do you also notice that the little shiny spots in the plate are less annoying when the whole image is corrected?
As mentioned before these kind of corrections really only work well in raw. If you haven’t used raw before you can give it a try by setting your camera to raw and jpg at the same time. It’s an easy way to test if you like shooting in raw. But give it some time!
Summary
- Set your camera setting to raw.
- Take a light and bright lens with you such as a 50mm 1.4 or 1.8 (and pay attention to your aperture!)
- Don’t be afraid to increase your iso to whatever is needed to prevent a blurry image
- Use a white napkin or white plate to soften shadows
- Hold a white napkin above your plate to block out harsh spotlights
- Try and have only one lightsource in the frame
Good luck and let me know if you have any questions!
Also read Shooting at night or in low light or check all the posts about food photography.


Great article. Having a small tripod with isn’t too obtrusive can always help get around low light allowing longer exposures for food shots.
Yes that would certainly help although I still find it pretty akward to set up a tripod (no matter how small) in a restaurant.. 🙂
Is het ook ergens in het Nederlands te lezen.
Ik as al zo blij toen ik las dat er aandacht wordt gegeven aan het fotograferen van voedsel maar mijn blijheid kreeg wel een duw toen ik alles in het Engels voor me kreeg.
Hè Joke. Jazeker. Je zit op de verkeerde site. Deze is Engels inderdaad maar simoneskitchen.nl is volledig Nederlands 🙂
Thanks so much – this was excellent. I have shot in raw +jpeg and tend to leave the raw sitting on my computer. I will learn how to confidently edit raw images now and see what the results are.
Glad you found it helpful Jules. I will be writing another article on how to work with raw images soon. So stay tuned for that! Once you’re used to working with raw you’ll never go back!
Great post! I don’t take that many restaurant photos, but I just got a new pocket camera (Richoh GR) that’s perfect for this. So I see a lot of this in my future. 🙂 Wonderful tips — thanks.
Thanks John! Glad you found it helpful!
Hoi Simone,
Goede tips, dank! Vooral de tip met het witte servet boven het bord is een goeie. Vind het nog best een uitdaging maar ga erg mijn best doen in het restaurant;-)
Tot 2 juli, creatieve groeten van Lucie
Succes in ieder geval en tot de 2e!
Groetjes
Simone