Chocolate chestnut cake recipe
Delicious chestnut chocolate cake. Perfect for fall and winter, but with canned chestnuts can be made all year round! It’s the perfect treat for a special occasion.

Chestnut Chocolate Cake
How delicious does this chocolate cake with chestnut puree look? And I can assure you, it is. It was the subject of a blog shoot that Alex and I did years ago. Alex had made the cake and we ate it on the spot, because gee … you want to have tasted this.
The cake is made with sweetened chestnut puree, you do not need whole chestnuts for making this. Depending on the season, you can sometimes buy it in a grocery store, but you can usually get it online. Around Christmas you can usually find the puree everywhere and I always buy it in bulk. It is canned so it will keep for a long time. Handy to have on hand! Especially great for sweet baking recipes.
Making the dough
You start the chocolate chestnut cake by making the base. This is simply a mixture of flour, unsalted butter and powdered sugar. The easiest way to make it, is in a food processor. I use the Magimix. You mix it well until it just starts to come together. Then turn the dough out onto your countertop and knead briefly until it comes together well. Wrap in plastic wrap and refrigerate for at least 30 minutes.
Chocolate chestnut Cake Filling
While the dough is resting, start making the filling. Separate four eggs. Melt the dark chocolate with the butter in a double boiler with a heatproof bowl. Allow it to cool slightly to room temperature, then add the egg yolks one at a time. Then add the cocoa, 50 grams of the sugar and the chestnut purée. Use a blender if necessary if the mixture is not smooth. You can also add a bit of vanilla extract if you want.
Beat the egg whites in a large bowl or in the food processor with the whisk attachment. Add the remaining 50 grams of sugar until it makes soft peaks and fold into the chestnut cream until smooth and even. Add a pinch of salt.
In the mold
For the chestnut chocolate cake, take a springform pan with a diameter of 22 centimeters. Line it with baking paper and press the dough into the pan. Try to spread it out as evenly as possible (we didn’t do a very good job here) and let it rise on the sides.
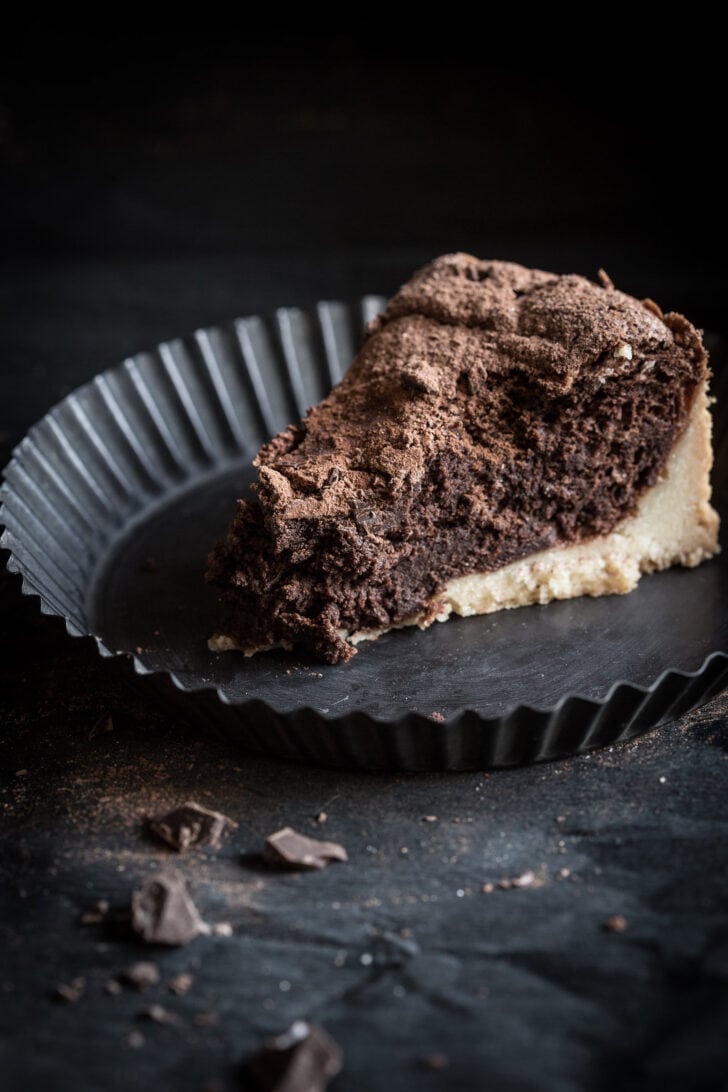
Pour the chestnut mixture on the bottom and bake the chestnut chocolate cake in the oven for about 25 minutes or until it is cooked and golden brown. Check if the cake is cooked by inserting a wooden skewer into the center of the cake. It’s ok if it still has a few moist crumbs when you pull it out but it shouldn’t be too wet. A slight wobble is ok. If it is let is bake for a little longer.
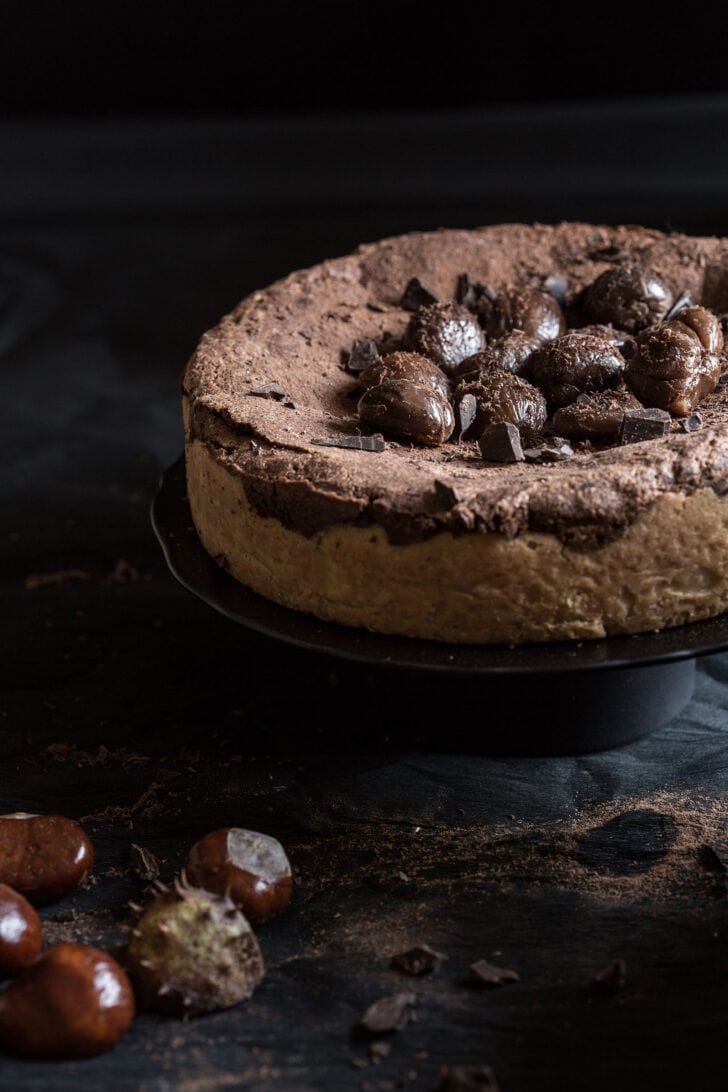
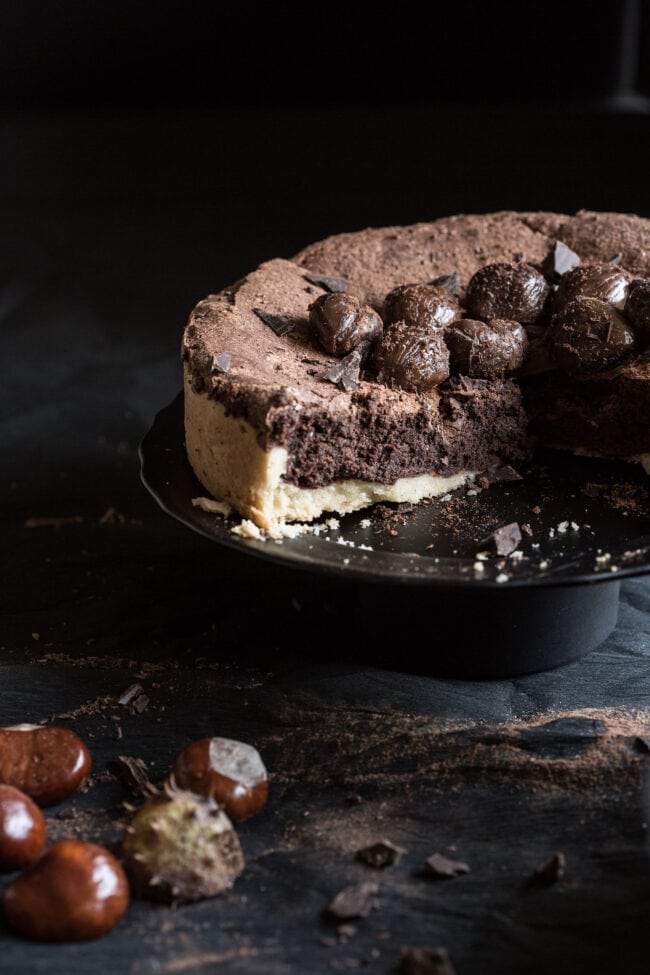
Meanwhile, mix the spices for the garnish. Let the cake cool on a cake rack. Once you’re ready to serve sprinkle the spice mixture on top of the cake and serve with whipped cream. You can also decorate the top of the cake with some roasted chestnuts as we did here but that is totally optional. This is absolutely a delicious chestnut cake and a favorite here. Apart from serving it with whipped cream you can also serve it with ice cream or sweetened crème fraîche. It makes for a perfect dessert during the entire year but especially during the festive season. And what better way to celebrate Valentine’s than with this delicious chestnut chocolate cake!
Chestnut chocolate cake

Equipment
- Springform tin 22 cm diameter
Ingredients
Pastry
- 130 gram cold butter
- 200 grams flour
- 60 gram icing sugar
Filling
- 180 grams dark chocolate 70% cacao content
- 130 grams butter
- 4 eggs separated into yolks and eggwhites
- 1,5 tbsp cocoa powder
- 100 gram sugar
- 250 gram chestnut puree
Garnish
- 1 tsp cinnamon powder
- 1/2 tsp cloves
- 1 tsp ground ginger
- 1 tsp ground chili
- 3 tbsp cacao powder
- 1 tbsp icing sugar
- pinch of seasalt
- Preheat the oven to 180˚C (350˚F)
- Put the cold butter, 200 gram of flour and the icing sugar together in a foodprocessor and mix for a few minutes until you have a firm dough. Turn out onto a kitchen counter and quickly knead until it all comes together. Wrap in clingfilm and leave in the fridge for at least 15 minutes. Roll it out a bit and press it into a greased caketin of 22 cm diameter. Make sure you have a standing edge of about 5 cm. Bake the bottom for about 15 minutes and then remove from the oven.
- Bring a layer of water to the boil in a saucepan and put a heatproof bowl on top of the pan and melt 180 grams of dark chocolate together with the 130 grams of butter (au bain marie). Remove the bowl from the heat. Mix the egg yolks in one by one, add 1,5 tbsp of cacao powder, 50 gr of the sugar and 250 gr of chestnut puree. Mix it all together well.
- In a clean bowl whip the egg whites to stiff peaks. Add the other 50 grams of sugar bit by bit. Fold in the egg white in batches into the chocolate mix. Spoon the mix onto the cake bottom, place in the middle of the oven and bake for about 25 minutes or until done. Leave to cool on a cake rack.
- Stir in a bowl the ingredients for the garnish and sprinkle with a little sieve on top
Nutrition Information per portion
Disclaimer
The nutritional values above are calculated per portion. The details are based on standard nutritional tables and do not constitute a professional nutritional advice.
Thanks for this post! I’m a photographer… new to the food photography part of things… and I wanted to try some “dark” food photography. This post was helpful and the ideas of using the black cardboard, etc. will definitely help me out. Thanks.
Glad it was useful for you Aubrie!
This is a kind of photography I always have wanted to try but didn’t know how to. Thanks for the tips. I better get some black cardboard. And the recipe sounds so delicious. I love chestnuts.
Yes the recipe alone is worth making… It’s a good thing I don’t bake this one every day as it is simple irresistible ! And black cardboard is such a handy thing to have!
I love these extremely helpful photography tip posts!!! I food blog, and my photos don’t turn out that great because I only have an iPhone 4 – I don’t have the funds to buy an actual camera.
I possible, could you do an iPhone tips?
I will definitely think about doing an iPhone session Megan!
Thank you so much for this amazing tutorial! I am trying to learn how to take better food photos so really appreciate the time you took to do this!
You’re welcome Julie! Glad you found it usefull!
I came across this recipe on tumblr I really want to try it! 😀 But the thing is that there’s no chestnut in my country. I’m so saaaad! Do you know some substitutes please? Its the only ingredient missing.
Well I can’t think of any ingredient that would be a good replacement as it is called a chocolate chestnut cake. 🙂 And the flavor is quite special. Maybe you can find something online?
Hello There.
I just thought I would let you know I stopped by. I found your site after searching for dark food photography advice.Your site was just what I needed. Great images with great advice. I like taking photos but am no expert but I wanted to take an image of a Tea bread cake/ recipe that had been given to me. I managed to get a photo all be it not in the same league as yours but much better than I could have hoped to have taken before reading your thread.
Many thanks 🙂
Gary
ps;
Added link to photo if allowed., if not delete. I followed your tips for blocking the light with cards.I couldnt think of a better composition so added the raisins/sugar.
O but that is a gorgeous result Gary! Love your photo and so glad I could be of help. Love the addition of the sugar and the raisins so I’d say well done!
Hello Simone.
I was wonder one of these days how to achieve this beautiful dark, but not lack of light, in photography, and here you are showing, beautifully I must say, how to do it. Thank you.
You’re welcome Regina. I hope it helps! 🙂
2 things:
1. You are hands down one of the most amazing food photographers I have come across. I just found your blog and I cannot wait to dive in. I am a practicing food photographer, and I just found my newest muse.
2. I have been trying to find chestnut puree for months, any tips?
Thanks so much Ginger. As for the chestnut purée; I’m afraid I’m not sure. I live in Europe and while not entirely common we can find it here when in season. Have you tried it online?
Hi Simone, thanks for your beautiful post, behind the scenes are always so helpful! Do you mind me asking what surface you shot the cake on? Was it fabric or paper? I’m trying to source food photography surfaces at the moment and struggling so any tips would be much appreciated! Thanks 🙂
He Ciara,
Glad you found the post helpful. I’ve actually used really cheap crinkle paper here. I am not sure how to call it in English. We call it crepe paper. It’s also been used to wrap around a christmas tree sometimes… Hope that makes sense?
Is the chestnut puree the sweetened type or just plain with no sugar or vanilla? Gorgeous shots… makes me want to go bake.
That one looks so delicious!
Amazing shoot and tips! Thank you for sharing;)
You’re welcome! 😉
I love this post! I just launched a food blog, and my photography skills are seriously lacking. But, I LOVE the dark photography. Your photos are dark, but there is still so much light. It’s such a beautiful contrast. Thank you!
Good to know you found the post helpful Sarah!
Hi Simone. Such a great tutorial, thank you so much! Would you mind sharing what you used as the dark surface? Was it a piece of fabric or paper?
Hè Petra! It’s a piece of black paper. The kind you also use to wrap around the Christmas tree!
I was looking for recipes to make with our abundance of chestnuts, and this one sounds delicious! Do you use already sweetened chestnut puree, or is it the unsweetened kind? (I’m going to make the puree myself, and I’m not sure whether or not to include sugar (as many recipes suggest)). Thank you!
He Sofie, I use the canned variety that is sweetened for sweet recipes such as this one. So yes I’d think a little sugar if you’re making it yourself!
We both love chestnut everything. This one is a keeper, for sure!
Ah thanks! Yes definitely worth trying!