Christmas sweet starbread with honey and anis

You see I had the fortune and honour to do the photography for Levine van Doorne, who is very well known here in the Netherlands for her bread, her blog about breadbaking and het bread baking workshops. And you know how that is with cookbooks right; one means more to you than the other. And in this case, I loved being part of it. I don’t often post a book review for books I worked on as it would be a bit silly to review them all but in this particular case I am making an exception. The book is in Dutch so I won’t be telling you about the book (and did the proper review on the Dutch side of the blog) but I just have to share this pretty bread as it is perfect for a christmas breakfast and I just happen to really like the photo.
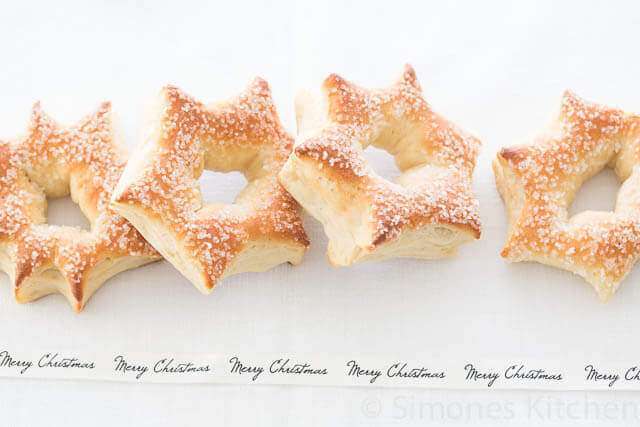
Which incidentally the placed the below picture in the book while I like the top one best, but space it not always available to place all photos in a book, I suppose.
Anyway the book is gorgeous and a must have for anyone who loves to bake bread and can read Dutch but the bread all in itself is something different.
If you’ve been following me a while you might know that bread and I don’t always see eye to eye… I love making it but I suck at it too… 😉 With some exceptions to the rule.
So these beauties are made by Levine but I am telling you below how to do it and I will be making these for christmas without a doubt as I know how good they taste!
All the recipes I tried were delicious and after each shootday we got a whole bunch of bread to go. I even have some in the freezer right now!
Try them you won’t be sorry!

Christmas sweet starbread with honey and anis

Ingredients
Dough
- 450 gram flour of good quality
- 9 gram dry yeast
- 1 tsp ground anisseed
- 8 gram salt
- 200 gram full fat milk of 20-25C roomtemperature
- 60 gram egg whisked
- 60 gram liquid honey
- 50 gram soft unsalted butter in cubes
Finish
- coarse sugar or cane sugar for sprinkling on the buns
You also need:
- sunflower oil to grease the bowl workspace and your hands
- a creditcard or something similar, cleaned!
- baking tray covered with baking paper
- Place all ingredients for the dough, except the butter, into a bowl and knead these with the standmixer for about 8 minutes till you have a firm dough. You can do this by hand as well but it will take slightly longer. Than add the butter, cube by cube and keep kneading until there is a smooth and flexible dough which forms a little thin sheet if you pull it apart with your hands.
- e rise: Form a ball of the dough and put this into a bowl that is lightly greased with sunflower oil. Turn it ones so all sides have a little bit of oil on them. Cover the bowl with clingfilm that is also brushed with oil and leave the dough to stand at roomtemperature for about 60 minutes or until doubled in size. The dough is risen well when you poke a hole in it which doesn't disappear.
- Shaping: Turn the dough out onto a lightly greased workspace and push the air out of it. Divide the dough with a dough scraper or with your hands into 12 equal shaped pieces. Make this into small round balls and leave them to rest covered with greased clingfilm for 10 minutes.
- Take one ball and press it flat with the palm of your hand and make sure that it stays in a round shape. Brush the doughpiece with water and sprinkle sugar on it. Using the short end of a creditcard make an incision in the middle of the doughpiece, making sure you do not cut through the sides of the dough. Cut the dough in the same way 3 or 4 more times so you get a star shape. Now take the piece of dough in your hands and the push the points of the star upwards and outwards and turn the doughflap basically inside out. The star points will now be on the outside of the doughflap. Put the stars with the sugar facing upwards on a baking tray spaced roughly 5 cm apart. Cover with greased cling film.
- Second rise: Let the star rise at roomtemperature for about 60 minutes till almost double in size. They are good when you press them with a wet finger and the dent slowly disappears.
- Preheat the oven: During the time you let the buns rise for the second time preheat the oven to 180 C (use upper and bottom heat if you have that) If you have circulating hot air in your oven turn the temperature down for about 20 C or follow the instructions of your oven.
- Bake the stars for about 10-15 minutes until cooked and golden brown. Put them on a rack to cool immediately after baking.
Disclaimer
The nutritional values above are calculated per portion. The details are based on standard nutritional tables and do not constitute a professional nutritional advice.

Sweet star shaped christmas buns with honey and anis
Ingredients
- Dough
- 450 gram flour of good quality
- 9 gram dry yeast
- 1 tsp ground anisseed
- 8 gram salt
- 200 gram full fat milk of 20-25C roomtemperature
- 60 gram egg whisked
- 60 gram liquid honey
- 50 gram soft unsalted butter in cubes
- Finish
- coarse sugar or cane sugar for sprinkling on the buns
You also need:
- sunflower oil to grease the bowl workspace and your hands
- a creditcard or something similar, cleaned!
- baking tray covered with baking paper
- Place all ingredients for the dough, except the butter, into a bowl and knead these with the standmixer for about 8 minutes till you have a firm dough. You can do this by hand as well but it will take slightly longer. Than add the butter, cube by cube and keep kneading until there is a smooth and flexible dough which forms a little thin sheet if you pull it apart with your hands.
- 1e rise: Form a ball of the dough and put this into a bowl that is lightly greased with sunflower oil. Turn it ones so all sides have a little bit of oil on them. Cover the bowl with clingfilm that is also brushed with oil and leave the dough to stand at roomtemperature for about 60 minutes or until doubled in size. The dough is risen well when you poke a hole in it which doesn't disappear.
- Shaping: Turn the dough out onto a lightly greased workspace and push the air out of it. Divide the dough with a dough scraper or with your hands into 12 equal shaped pieces. Make this into small round balls and leave them to rest covered with greased clingfilm for 10 minutes.
- Take one ball and press it flat with the palm of your hand and make sure that it stays in a round shape. Brush the doughpiece with water and sprinkle sugar on it. Using the short end of a creditcard make an incision in the middle of the doughpiece, making sure you do not cut through the sides of the dough. Cut the dough in the same way 3 or 4 more times so you get a star shape. Now take the piece of dough in your hands and the push the points of the star upwards and outwards and turn the doughflap basically inside out. The star points will now be on the outside of the doughflap. Put the stars with the sugar facing upwards on a baking tray spaced roughly 5 cm apart. Cover with greased cling film.
- Second rise: Let the star rise at roomtemperature for about 60 minutes till almost double in size. They are good when you press them with a wet finger and the dent slowly disappears.
- Preheat the oven: During the time you let the buns rise for the second time preheat the oven to 180 C (use upper and bottom heat if you have that) If you have circulating hot air in your oven turn the temperature down for about 20 C or follow the instructions of your oven.
- Bake the stars for about 10-15 minutes until cooked and golden brown. Put them on a rack to cool immediately after baking.
Disclaimer
The nutritional values above are calculated per portion. The details are based on standard nutritional tables and do not constitute a professional nutritional advice.
©2024 Simone's Kitchen. Design by Purr.
How pretty are these! I’m going to make these for the holidays. I’ll be a hero.
You’re always a hero Maureen! 🙂
These are beautiful photos! I am not much of a bread maker, but these look so tempting to try!
Thanks so much Sheila!
Love this recipe! The flavor of anise is so nice in bread. Terrific pictures, too!
What a lovely recipe for the holidays! Your sweet bread looks gorgeous! Hugs, Terra
Thanks so much Terra!