Working with artificial lights – part I, the diningroom lights

This one is taken by daylight to have a starting point
Now that the light is already starting to dwindle earlier in the day taking a photo of your food after you had your dinner is starting to become more of a challenge each day. Not everyone has a fully equipped studio with studioflashes and to be honest, even though I do, they’re usually stashed away in it’s own large suitcase and are stored, so putting them up is not my favorite job… My studio is small and with the lights out moving around is a little harder so they are not setup by default.

This is the best result I got with these particular lights.. Not so great!
But that is not to say that you cannot take a decent picture of your food with the existing lights you might have in your home. So I figured I’ll start writing a whole new series; working with artificial lights. I am not assuming that all light are equally suitable to take photos of your food but I will try with all lights we have available in our home and I will end the series with my studio flashes. Ofcourse, for each setup I will show the setting I used and if I used any tools to make the photo.
For the start of the series I figured I would use the most unlikely lights we have in our house. The most unlikely as these are totally unfit to be used for foodphotography but I did say I would be using all light, right? These are our diningroom lights. They are fixed and hanging above the table. Not ideal in any situation and even worse, these lights are fitted inside copper lamps so there will be an additional colorcast thrown by the lamps themselves.
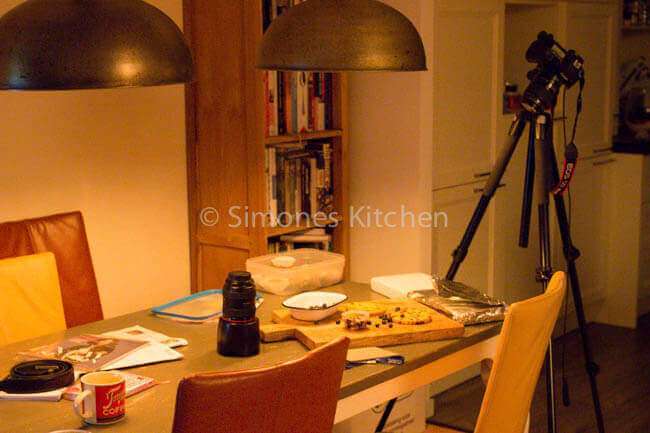
The setup; dining table with two large copper lights.
So let I just start by saying; “Don’t try this at home’, becuase these lights are far from ideal. As you can see from the very first picture it has a horrendous yellow glow without modification and our lights are great for a cosy gathering with friends but totally not so good for shooting your food. But ok, for the sake of argument… let’s say these are your only available lights. What would you be able to do with them?

This is the first unedited photo from the camera
First; you would have to shooting in raw if you have any hope of correcting this in post processing, so please shoot in raw if you want to try artificial lighthing. Secondly it is clear that we need to work on the colorcast as the first priority but there are some heavy shadows we need to deal with too. For correcting the color I have taken a photo with a grey card and correct this in Lightroom with the use of the colordropper.
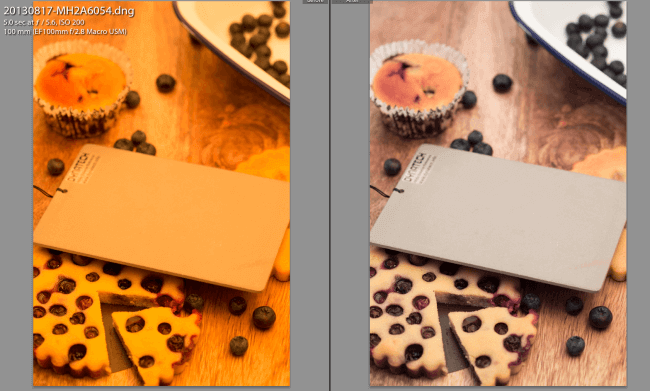
What remains is a bit of an unnatural color still, but it is at least a 100% better as the original.
The second thing I did in trying to make the most out of a bad situation is to take some of the harshness of the lights away by using a diffuser. I’ve used one that I bought but you can also use a piece of tracing paper or a piece of white curtain you might have hanging around. Keep in mind that you might also need an extra hand to hold this! By using the diffuser the light becomes a bit softer and the shadows more pleasing to the eye.

Left without diffuser, right with diffuser
As you can see the photo with the diffuser still has some shadows there but they are nicer to look at. Still the photo has a bit of a weird purplish look to it and whatever I did I couldn’t correct it. Compairing it to the first daylight photo this is by no means ideal and would not be a lighting situation I would choose to use, ever.
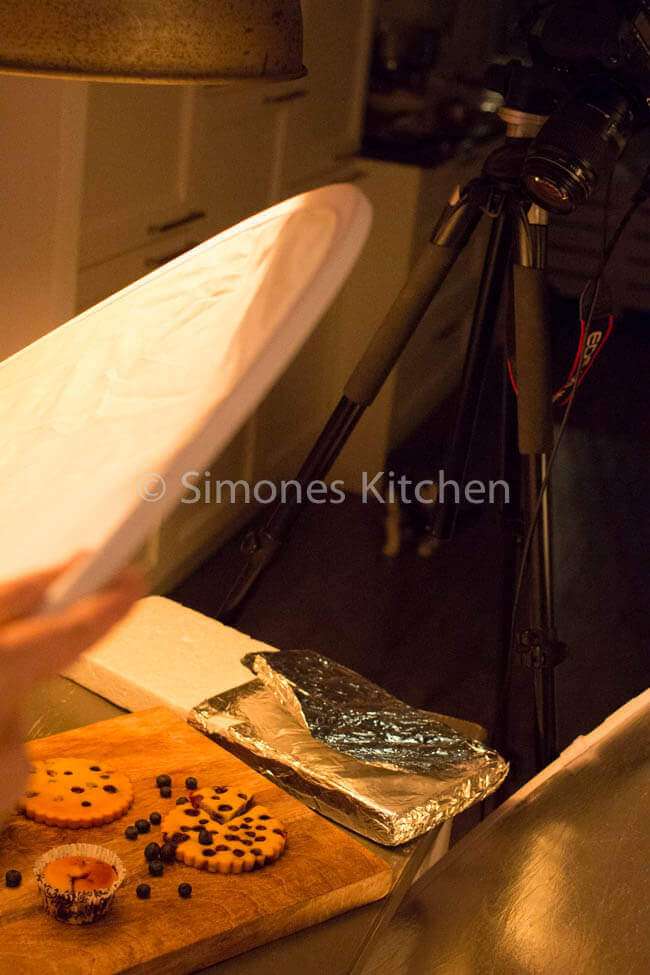
Diffuser between light and subject
The end conclusion of this first test is that your dining room fixed lights might not be the ideal candidates for taking a photo in artificial light. If you have diningroom lights with a white hood, you might do much better in terms of color and your photo might even be presentable but using overhead lights in my opinion is hardly ever the best option.
In the second post I will be testing out an average office light you might have on your desk!