Foodphotography; shooting at night or in low light

For today’s post I am gonna try and explain how you can solve some of the problems that occur when shooting in low light or at night. Especially at this time of year it seems to be impossible to shoot your dinner in daylight since, well, most people don’t eat their main meal during lunchtime right? And while certainly not impossible; shooting at nighttime does create some problems and most have to do with the fact that artificial light has a different color as natural daylight.
So in order to explain you how to shoot during the evening you have to know that each type of lamp, whether that be a regular bulb, halogen, fluorescent light etc. has it’s own special color temperature. Daylight itself can vary in color during the day; early in the morning the light is bluish, while later in the day it becomes more warm and yellowish. And again that varies in each season. The color of the light is generally referred to as degrees Kelvin. I won’t get all technical here but as a rule keep in mind that daylight is generally around 5000K (as in Kelvin). A flashlight is daylight balanced at 5500K, which is why when using flash, the colors in your photo tend to be correct. Colortemperature in photography is generally referred to as white balance.
But as we all know flash is just too harsh and unattractive in general. I forgot to take a photo with flash while doing the other shots so it looks slightly different than all the other photos but you’ll get the picture. Very unattractive!
Even with flash there is a huge difference between direct flash which is the left photo or indirect flash, which is the photo on the right. Here I bounced the light of the ceiling, but this is ofcourse only possible if you have an SLR with a separate flash with a swivelhead. There are trics if you don’t have that but that is maybe more for a separate topic. For now we will focus on regular lights you might have in your home.
I started this excercise of with taking a photo without any light. I did shoot all of these during daytime but I have curtains in the studio that make it virtually nighttime, so trust me when I say there was no daylight coming in. This will not work at night because if it is pitchblack you’ll be waiting forever until your photo is taken. In this case I had to wait 30 seconds for the exposure to finish (needless to say that you cannot do this without a tripod!)

As you can see the original on the left is very orange and has a red tint. I am guessing this is due to the fact that my curtains are some kind of beige so the little light that was coming in probably cast a weird color. I shoot in raw – always – and have used a

greycard to correct the whitebalance afterwards. A greycard is nothing more then a card which you position in your scene and then take a photo in the same light conditions as your actual photo and let’s you adjust the while balance later in software.The reason for using a ‘greycard’ is that it represents an average neutral.
Keep in mind that you can only do this properly if you shoot in raw! (which I would strongly urge you to if you have an SLR and difficult light situations. If you don’t have an SLR you can try the manual whitebalance instead, which some, not all, compacts have. To use the custom white balance you take a photo in the same situation as your final shot of a white sheet of paper. You set your camera to custom white balance and it will ask for a reference point. You look up the photo of the white sheet that you took (make sure it shows nothing else but the white sheet) and select that. For all photos now taken in the same light situations your camera will remember that setting and adjust the whitebalance accordingly.
I have shot all photos here except the flashphotos with exactly the same setting on a tripod.
If you do own an SLR I would recommend you get familiair with shooting in raw. It’s not as complicated as you might think but it can save your photo in situations like this.
After taking these shots without any additional light I used small halogen lights. They were small tiny lights so if you want to use those diffusing the light might make the shadows less harsh but I actually liked the effect they gave so I kept them as it. I will first show you a photo of the setup and the lights that were used.
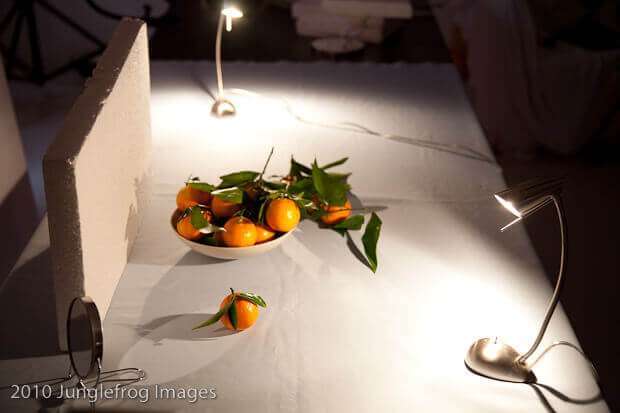
As you can see very simple. I used the mirror in front to decrease a little bit of the heavy shadow on the first mandarin.I started by using one light which is the first photo below, but liked it more with two lights
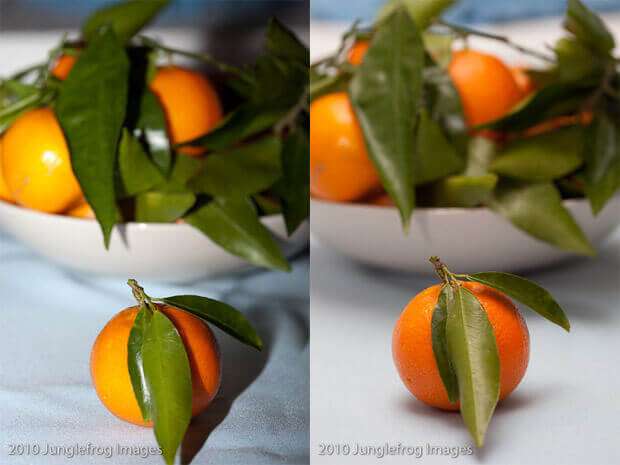
And this is the end result; first on the left the uncorrected version, then the corrected version and then the version with two lights.

In case you were wondering; the tablecloth is light blue. 🙂
As you can see in the background on photo two; the light becomes in general much bluer when corrected (again I did this with a greycard) and because there is now a big difference between the light in the front and the light in the back I preferred the two light version where you cannot see the background behind it anymore. But the results are quite acceptable I think.
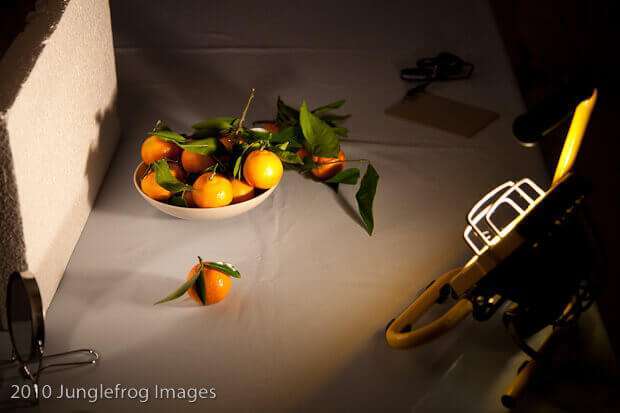
So then I went on to use a building light or construction light, not sure how you would call them in English but they are the kind of lights that are used in general on building sites. One of the (big) disadvantages with these lights is that they become scorching hot, so unsuitable to use if you have little kids running around. I wouldn’t go for these but they are cheap and they work too.
Again first a photo of the setup with one light; I ended up using two lights in the last photo of the series.
The photos I took are again from left to right; uncorrected, corrected and with two lights.

As you can see the light without correction was quite yellow and very easy to correct with the use of a greycard! Because I was in the studio I did not have any regular lightbulbs but essentially the technique would be exactly the same, wether you use fluorescent or whatever lightsource. Just make sure you do not use different kinds of lightsource as that will make it almost impossible to correct for the right colortemperature. So always use sure that you use two of the same light sources if you use two. For reflective material I used cheap foamboard to lift the shadows a tiny bit. You can always also use little mirrors if you want to light up certain parts of your image or give something a little shimmer.
Last is a daylight balanced light which are not that expensive to buy if you want to.. It makes it easier to handle if you shoot with a compact or always shoot on jpeg (and don’t feel like using raw) You can buy small light such as the Lowel Ego Lights, which are great to work with or any other kind of brand really. I have Interfit which I don’t know if that is English or Dutch, but regardless of which you use make sure they are daylight and not anything else.

Even with a daylight lamp you might still have to correct a little bit. Make it a habit to use your greycard as that can make a huge difference! Below the results with the daylight lamp. I had only one so can’t show you how it looks with two, but as you can see you don’t really need two to get good results. I have one in the studio and one that I use at home when I want to shoot something in the evening. As you can see the lights have a wider area making the lift softer then a pinpoint light such as the little halogen lights. But ultimately it depends on what kind of effect you want to achieve.
Because there was really little difference between before and after light correction for the daylight lamps I thought I show you one taken with the daylight lamp (on the left) and one taking with studioflash (on the right) Really not that big a difference. The shadows are a little softer but that’s about it.

As you can see it is very well possible to shoot at night with results that are as good as shooting in daylight and the good news is that you do not need very expensive equipment to do so. It does help if you own an SLR and get yourself familiair with shooting in raw and using a greycard or custom white balance, but even with a compact you can achieve good results or maybe I should say better results that shooting with flash. With any kind of light you have to pay attention to how the light falls on your subject and where it creates shadows. Daylight usually comes through a large window and is by that alone softer then articificial light but if you use that to your advantage there is no reason why you cannot take good photos in the evening.
Good luck and let me know if you have questions!
Thank you! This was very helpful.
Good to hear! Thanks!