Chinese dumplings/potstickers. Daring Cooks June challenge!
I was quite happy to read that the new challenge for june for the Daring Cooks was Chinese Dumplings. The challenge was hosted by Jen from use real butter, who is a master in making these!
I had made those once before during a chinese workshop although we did use the premade wonton wrappers to do so, which proved to be much easier then the handmade dough that we had to make for this new adventure… 🙂
I almost didn’t make it, as it has been crazy busy lately, but I finely managed to make them with the help of Tom. This to me is something ideally suited to do together, so one person can roll the dumplings and the other can fill them and pleat them.
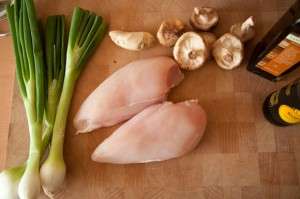 For the filling I chose to use chicken fillet rather then pork. The reason was that I wasn’t too sure what pork to use and figured I might as well use chicken. I used spring onions, cut down a little on the ginger as I know Tom is not a huge ginger fan and added the other ingredients for the filling pretty much as per the recipe. I minced the chicken in the Magimix, just to get it small enough and sticky enough. The rest of the ingredients were chopped by hand. Quite a lot of chopping but it’s ok to do.
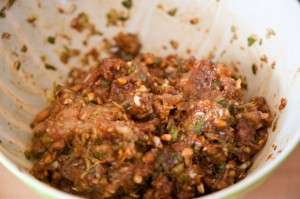 I was a bit worried that the finished filling was too wet, but it actually turned out delicious and great in texture, so that was all ok.
Now over to the dough; I put the flour in the magimix and added the warm water while it was turning. I kept mixing untill it was all incorporated as the recipe stated, but when I took it out of the machine it was incredibly sticky!! So I think I used a bit too much water, but that was easily (albeit a little messy) solved by adding more flour to the mixture.

As soon as the dough became a bit more better too handle I popped it in a bowl to sit for 15 minutes.
Creating the correct size dumpling forms was actually not so easy. As it turned out we should have rolled the dough out thinner, as it was still a bit too thick, but we only noticed that really while eating them a little later. We started with rounds that were too small, then they were too thin and we ended by having them too thick… 🙂 O well, practice makes perfect right?
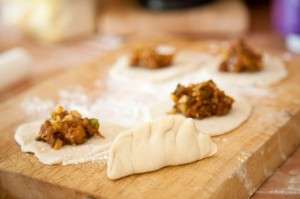 I found the pleating quite difficult and was very tempted to make a nice pattern with a fork instead. I’ve seen that many times in chinese restaurants and now I know why! It’s not entirely disastrous looking but I do think I have to make a couple of batches before being able to make pretty ones as Jen from Use Real Butter is doing so nicely!
We made them all with the same filling, as I made way too much filling for the amount of dough that we had, so that will have to find another destination, which shouldn’t be hard as it’s versatile enough to make into another kind of dish. I wanted to steam part of the dumplings and panfry the other part. I’m not a big fan of cooked dumplings so decided to skip that part.
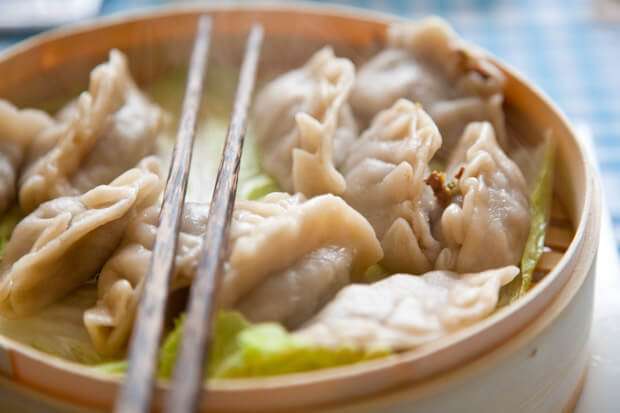
I lined the cabbage in the steamer and forgot to oil it, which meant that some of the dumplings were a bit sticky after being steamed but not dramatically so I could still get them out. I think this would make a perfect starter if we manage to improve on our technique! I steamed the dumplings for 6 minutes and while I thought it would be too short they were actually perfectly done when I checked one.
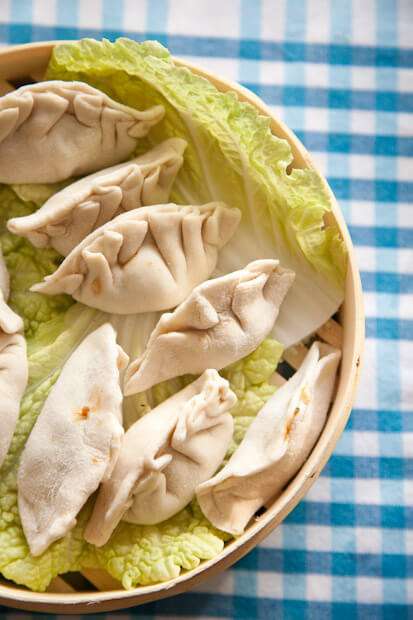
As you can see on the photo some of the dumplings have better pleating then others.. Haha.. 🙂
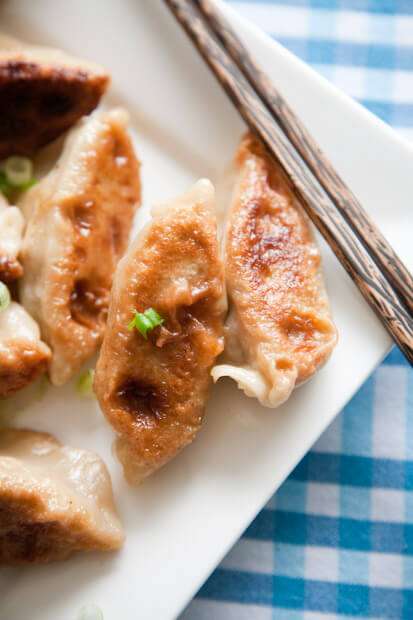
We did the other batch in the pan but the gas was on a little too high I think as it went too quickly and they almost burned. Not quite, so still very edible, but they are a bit dark as you can see from the finished photo further down below.
All in all a great recipe, which does need a bit of practice before we can safely serve this to guests, but I thought it was incrediby tasty and can see loads of other fillings that you can use with these dumplings. I want to also try if they would work if you deepfry them. Not sure if that would be tasty or maybe too greasy but I would love to have them brown all over with a crispy skin.
As I mentioned we made the dumplings too thick in terms of the dough so definitely something we need to improve on for the next time.
The panfried ones compaired to the steamed ones I thought that the difference was minimal, while the fatcontent of the steamed ones is so much lower, so that to me has the preference. Not a big taste difference but it could be that we did something wrong here. We will try again as this is for sure going to be a keeper!

Chinese dumplings or potstickers

Ingredients
pork filling:
- 1 lb 450g ground pork
- 4 large napa cabbage leaves minced
- 3 stalks green onions minced
- 7 shitake mushrooms minced (if dried - rehydrated and rinsed carefully)
- 1/2 cup 75g bamboo shoots, minced
- 1/4 55g cup ginger root, minced
- 3 tbsp 40g soy sauce
- 2 tbsp 28g sesame oil
- 2 tbsp 16g corn starch
Or shrimp filling:
- 1/2 lb 225g raw shrimp, peeled, deveined, and coarsely chopped
- 1/2 lb 225g ground pork
- 3 stalks green onions minced
- 1/4 cup 55g ginger root, minced
- 1 cup 142g water chestnuts, minced
- 1 tsp 5g salt
- 3 tbsp 40g sesame oil
- 2 tbsp 16g corn starch
Dough
- (double this for the amount of filling but easier to make it in 2 batches - or just halve the filling recipe
- 2 cups 250g all-purpose flour
- 1/2 cup 113g warm water
- flour for worksurface
Dipping sauce
- 2 parts soy sauce
- 1 part vinegar red wine or black
- a few drops of sesame oil
- chili garlic paste optional
- minced ginger optional
- minced garlic optional
- minced green onion optional
- sugar optional
- Combine all filling ingredients in a large mixing bowl and mix thoroughly (I mix by clean hand). Cover and refrigerate until ready to use (up to a day, but preferably within an hour or two).
- Make the dough, Method 1: Place the flour in the work bowl of a food processor with the dough blade. Run the processor and pour the warm water in until incorporated. Pour the contents into a sturdy bowl or onto a work surface and knead until uniform and smooth. The dough should be firm and silky to the touch and not sticky.[Note: it’s better to have a moist dough and have to incorporate more flour than to have a dry and pilling dough and have to incorporate more water).
- Make the dough, Method 2 (my mom’s instructions): In a large bowl mix flour with 1/4 cup of water and stir until water is absorbed. Continue adding water one teaspoon at a time and mixing thoroughly until dough pulls away from sides of bowl. We want a firm dough that is barely sticky to the touch.
- [EDIT: 5/26/09] There have been two complaints posted about a dry dough and I realize that this rests in the problem of measuring flour which has a different density and hence weight for 2 cups depending on how you scoop it. That is why I also list the weight: 250g. Flour tends to settle over time, so when I scoop it out, I shake several cups' worth back into the container before taking a final scoop of soft, fluffy, flour and I get 250g for 2 cups. When you knead the dough, if it feels hard and dry, then you can add more water. [Warning: it will NOT be a soft bread dough, so don't expect it to be, but it shouldn't be a brick either.] It is perfectly fine to use more than the 1/2 cup listed in the recipe as everyone's climate and flours vary. Use your judgment - this is what being a Daring Cook is about. We are trying to cultivate a sense of intuition so that recipes are general guidelines from which you can expand your own style.
- Both dough methods: Knead the dough about twenty strokes then cover with a damp towel for 15 minutes. Take the dough and form a flattened dome. Cut into strips about 1 1/2 to 2 inches wide. Shape the strips into rounded long cylinders. On a floured surface, cut the strips into 3/4 inch pieces. Press palm down on each piece to form a flat circle (you can shape the corners in with your fingers). With a rolling pin, roll out a circular wrapper from each flat disc. Take care not to roll out too thin or the dumplings will break during cooking - about 1/16th inch. Leave the centers slightly thicker than the edges. Place a tablespoon of filling in the center of each wrapper and fold the dough in half, pleating the edges along one side (see images in post for how to fold pleats). Keep all unused dough under damp cloth.
- To boil: Bring a large pot of water to a boil and add dumplings to pot. Boil the dumplings until they float
- To steam: Place dumplings on a single layer of napa cabbage leaves or on a well-greased surface in a steamer basket with lid. Steam covered for about 6 minutes.
- To pan fry (potstickers): Place dumplings in a frying pan with 2-3 tbsp of vegetable oil. Heat on high and fry for a few minutes until bottoms are golden. Add 1/2 cup water and cover. Cook until the water has boiled away and then uncover and reduce heat to medium or medium low. Let the dumplings cook for another 2 minutes then remove from heat and serve.

- To freeze: Assemble dumplings on a baking sheet so they are not touching. It helps to rub the base of the dumpling in a little flour before setting on the baking sheet for ease of release. Freeze for 20-30 minutes until dumplings are no longer soft. Place in ziploc bag and freeze for up to a couple of months. Prepare per the above instructions, but allow extra time to ensure the filling is thoroughly cooked.
Disclaimer
The nutritional values above are calculated per portion. The details are based on standard nutritional tables and do not constitute a professional nutritional advice.
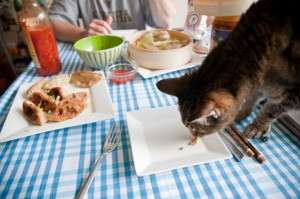
Now to finish this all off; Gizmo also thought that the dumplings were very tasty… Ofcourse she was only allowed on the table for a little while so I could quickly take a snap and then she was removed from the table!!
i love that photo of you with dough all over your hands! great job though – like you this was my first time not using bought wrappers.
Wonderful pix of you and the sticky dough – no I think you overfried them at all I fried them to an inch of almost burned and when steamed tasted very very good they had a great deep taste as compared to the just steamed ones. O and deep fried works out great also. Yes the pleating/making of the dumplings does take some practice. Thanks for kind comments on my blog.
Lovely photots and what a great result! 🙂
Simone – your pleating looks amazing!!! I love the photo of you with the dough..you are one beautiful lady 🙂 Talent and looks, geeez! lol That said, I was going to do something chicken too, but changed my mind. Now that I see yours, I wish I had! Gorgeous and mouth watering job as always!
Beautiful dumplings and nice pleating. You look like your having a ton of fun.
They look great! Looks like we had similar proplems with the dough and pleating!
I love all the instructional tips you added! great job – your pleating looks a lot better than mine!
I love your absolutely beautiful photos and dumplings! Congratulations!
Great job! They look delicious. I’d love to try this sometime–when I have plenty of time and patience!
Wasn’t this a great challenge? Your dumplings and photos are wonderful. Have a good day.
Gizmo! You know I love seeing the pics of the cats eating your meal!I think your pleating came out wonderfully, I didn’t even do it…to lazy! I do think that you can deep fry them. Ian says that it is the same dough for perogies and I have deep fried those (so good!). The picture of you holding the dough is gorgous!
the fillings should taste good-a thinner dough and better pleating will be perfect.
the fillings should taste good-a thinner dough and better pleating will be perfect.
You look so happy with all that dough over your hands:) Your pot stickers looks fantastic and looking at these pictures are making me really hungry:)
I think you did a fantastic job! It was definitely a process, but a fun one.
Fantastic job with the dumplings! They look so appetizing and now you’ve got me craving for dimsum! 🙂
They look amazing, but too much effort involved! I like working as a team with the hubby, it is really funny sometimes.
Nice job! I love that Gizmo got in on some of the action!
The photo of you is adorable! And both of your dumplings, the steamed and the fried, look perfect as well as delicious! I must make these again. They are pretty simple to do and the one Chinese dish I can offer my Chinese food loving son.
They look so tempting and delicious!!!
(Appologies if my comments appears twice, I had a connection problem)
Great job! I love the picture of the different pleats! I think we all had to deal with seeing our technique evolve…
I personally liked the crunchier texture of the potstickers, but the steamed ones were also really good (and, as you pointed out, healthier). They’re both keepers!
Yours look great! My pleating wasn’t the best either, but it’s the taste that matters.
Btw, LOVED your comment about “speaking Russian” in your cake photo class 🙂 I actually DO speak Russian 🙂
CUTE photos!!! Your potstickers look delicious! It’s nice to have help in the kitchen too =) I’m lucky that my guy loves cooking as much as I do!
They look amazing! As always the photos are so pretty!
They look amazing! As always the photos are so pretty!
Oh, I just love the photos of your with the dough and Gizmo cleaning up the plate 🙂 You did a wonderful job on this challenge and I think they look great. Gold star for doing it all from scratch!
These look delicious. I have to recruit a helper next time too. All he did was eat them!
Your photos never ceased to amaze me.. Great job on those dumplings =)
Did you use a lightbox to shoot it? My photos are starting to suffer from the lack of natural light in this winter, I may just have to construct a lightbox to fix it. But I’m still not convince whether it will make a great deal of difference, what do you think? I need some expert advice =)
yeah, that’s the problem, my house is lacking natural lights, when I try shooting at night, it always come out yellowish.. Even after I play around with the WB (perhaps it’s because of my hallogen light that tends to have a yellowish effect). I lost the head of my tripod (the thing that is suppose to be attached to the camera), and I haven’t had the budget to buy a new one.. I’m saving for a manfrotto. Perhaps I’m just gonna buy a cheap one for now, since it’s getting harder to find time to shoot during daylight as winter’s rolling in. Thanks for the tips =)
Simone, these look so great! The photos are wonderful and I would never have guessed that you had the troubles that you did. Simply beautiful!
Great job, I love your photos! That Gizmo is a lucky little kitty 🙂
Hi Asti. I never use a lightbox, but use a tripod if there is a lack of daylight or it’s rather dark. I’m not sure where you live but even without a lot of light you should still be able to use natural light and maybe a few reflectors to light up certain shadow areas. Do yo use a tripod or do you shoot handheld? If there is not a lot of light it really helps to keep the camera stable! I’ll have a look at your blog too…. 🙂